
CIP #34 - Making Concrete Cylinders in the Field
WHAT are Concrete Test Cylinders?
Most commonly, the compressive strength of concrete is measured to ensure that concrete delivered to a project meets the requirements of the job specification and for quality control. For testing the compressive strength of concrete, cylindrical test specimens of size 4 × 8-inch (100 × 200 mm) or 6 × 12-inch (150 × 300 mm) are cast and stored in the field until the concrete hardens in accordance with the requirements of AS TM C 31, Standard Practice for Making and Curing Concrete Test Specimens in the Field.
Most specifications require that technicians certified by the ACI Field Testing Certification Grade I, or an equivalent program make test specimens in the field. When making cylinders for acceptance of concrete, the field technician must test other properties of the fresh concrete to include temperature, slump, density (unit weight) and air content. This information should accompany the set of cylinders made for a particular pour or pour location. A strength test result is always the average of at least two specimens tested at the same age. A set of 2 to 6 cylinders may be made from the same sample of concrete at a minimum for every 150 cubic yards (115 m³) of concrete placed.
WHY Make Concrete Test Cylinders?
According to ASTM C 31, the results of standard-cured cylinders are used for:
® Acceptance testing for specified strengths
® Verifying mixture proportions for strength
® Quality control by the concrete producer
It is of prime importance that the specimens are made and cured following standard procedures. Any deviation from standard procedures will result in a lower measured strength. Low strength test results due to procedures not in accordance with the standards cause undue concern, cost and delay to the project.
The strength results of field-cured cylinders are used for:
® Determining the time at which a structure is permitted to be put into service
® Evaluating the adequacy of curing and protecting concrete in the structure
® Scheduling removal of forms or shoring
Curing requirements for field-cured cylinders are different from standard curing and the two should not be confused. Refer to ASTM C 31 for details on curing field-cured specimens.
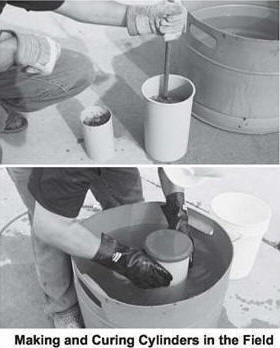
HOW to Make and Cure Cylinders?
 ► Equipment needed at the
job site:
► Equipment needed at the
job site:
® Molds for casting cylinder specimens. Plastic molds are most common.
® Tamping rod with hemispherical tip: ⅝-inch (15mm) diameter for 6 × 12-inch cylinders, or ⅜-inch (10mm) diameter for 4 × 8-inch cylinders, or a
vibrator.
® Rubber or rawhide mallet, 1.25 ± 0.50 lb. (0.6 ± 0.2 kg)
® Shovel, hand-held wooden float, and scoop
® Wheelbarrow or other appropriate sample container
® Water tank or curing box with provisions to maintain required curing environment during initial curing period.
® Safety equipment as appropriate to handle freshly mixed concrete.
► Sampling concrete from a ready mixed concrete truck:
It is very important to obtain a sample of concrete that is representative of the concrete in the truck mixer. Sampling from concrete delivery units should be conducted in accordance with ASTM C 172 Standard Practice for Sampling Freshly Mixed Concrete. Concrete should be sampled from the middle of the load. The first or last discharge from the load will not provide a representative sample. The concrete must be sampled by diverting the chute into a wheelbarrow so that the entire discharge stream is collected. At least two portions during discharge are necessary to obtain a composite sample. The time elapsed between the first and final portion of the composite sample must not exceed 15 minutes. The minimum required size of the concrete sample is 1 cu. ft. (28 L).
► Prior to Casting Cylinders:
Cover the sample with a plastic sheet to protect the concrete from evaporation, sunlight, and contamination. Move the sample to the location where the fresh concrete tests are to be conducted. The testing location should be close to where the cylinders will be stored undisturbed for the initial curing period. After the concrete is transported to the location for casting the cylinders, remix the concrete in the wheelbarrow. Begin the slump, density (unit weight), and air content tests within 5 minutes and start molding cylinders within 15 minutes after the sample was obtained.
► Casting the Test Cylinders:
1. Label the outside of the mold with the appropriate identification mark. Do not label the lids or tops.
2. Place the cylinder molds on a level surface.
3. Determine the method of consolidation.
® For concrete with slump less than 1-inch (25-mm), concrete should be consolidated by vibration.
® For concrete with slump 1-inch (25-mm) or higher, either rodding or vibrating is permitted.
4. Determine the number of layers of concrete to be placed in the mold.
® For concrete to be consolidated with the tamping rod, place concrete in 3 equal layers for 6 × 12-inch cylinders; and in 2 equal layers for 4 × 8-inch cylinders.
® For concrete to be consolidated by vibration, fill the mold in two equal layers.
5. Place the concrete in the mold by distributing it around the inside of the mold with the scoop. Consolidate the layer by rodding 25 times, evenly distributed around the layer. When using a vibrator,
insert it long enough so the surface is smooth and large air pockets ceases to break through to the top. Two insertions of the vibrator are required for a 6 × 12-inch and one insertion is required for a
4 × 8-inch cylinders. Avoid over-vibration.
6. Tap the sides of the mold 10-15 times with the mallet after each layer in order to close any insertion holes formed either by the rod or the vibrator.
7. Strike off the top with a wooden float to produce a flat, even and level surface and cover with a plastic lid or a plastic bag.
► Storing and transporting test cylinders:
® Move cylinder molds with fresh concrete very carefully by supporting the bottom.
® Place the cylinders on a flat surface and in a controlled environment where the temperature is maintained in the range of 60 to 80°F (16 to 27°C). When the specified strength of the concrete is greater
than 6000 psi (40 MPa), the temperature range for initial curing should be maintained in the range of 68 to 78°F (20 to 26°C).
® Immersing cylinders, completely covered in water is an acceptable and preferred procedure that ensures more reliable strength results. Temperature in storage, such as in curing boxes, should be
controlled using heating and cooling devices as necessary. The maximum and minimum temperature during initial curing should be recorded and reported.
® Protect cylinders from direct sunlight or radiant heat and from freezing temperatures in winter.
® Cylinders must be transported back to the laboratory within 48 hours of casting. Some concrete mixtures may take longer to set and these specimens may be transported at a later time. In any event
cylinders should not be moved or transported until at least 8 hours after final set.
® Store cylinders to prevent damage and maintain moisture during transportation. Travel time from the jobsite to the laboratory should not exceed 4 hours.
|
Follow These Rules to Make and Cure Standard Cured Strength Test Specimens
1. Obtain a representative concrete sample.
2. Place the concrete in layers in the molds and consolidate using standard equipment and procedures.
3. Finish the surface smooth and cover the cylinder with a cap or plastic bag.
4. For initial curing, store cylinders in the required temperature range. Protect from direct sunlight or extreme weather.
5. Transport the cylinders to the laboratory with proper protection within 48 hours after they are made.
|
|
CAUTION
Fresh concrete can cause severe chemical burns to skin and eyes. Keep fresh concrete off your skin. When working with concrete use rubber work-boots, gloves, protective eyeglasses, clothing and knee-boards. Do not let concrete or other cement products soak into clothing or rub against your skin. Wash your skin promptly after contact with fresh concrete with clean water. If fresh concrete gets into your eyes, flush immediately and repeatedly with water and consult a doctor immediately. Keep children away from dry cement powder and all freshly mixed concrete.
|
References
1. Annual Book of ASTM Standards, Volume 04.02 Concrete and Aggregates, ASTM, West Conshohocken, PA, www.astm.org
® ASTM C 31. Standard Practice for Making and Curing Concrete Test Specimens in the Field
® ASTM C 39, Standard Test Method for Compressive Strength of Cylindrical Concrete Specimens
® ASTM C 172, Standard Practice for Sampling Freshly Mixed Concrete
® ASTM C 617, Standard Practice for Capping Cylindrical Concrete Specimens
2. How Producers can Correct Improper Test-Cylinder Curing, Ward R. Malisch, The Concrete Producer, Nov 1997, pp. 782 – 805, www.worldofconcrete.com
3. NRMCA/ASCC Checklist for Concrete Pre-Construction Conference, NRMCA, Silver Spring, MD, www.nrmca.org
2001
![]()